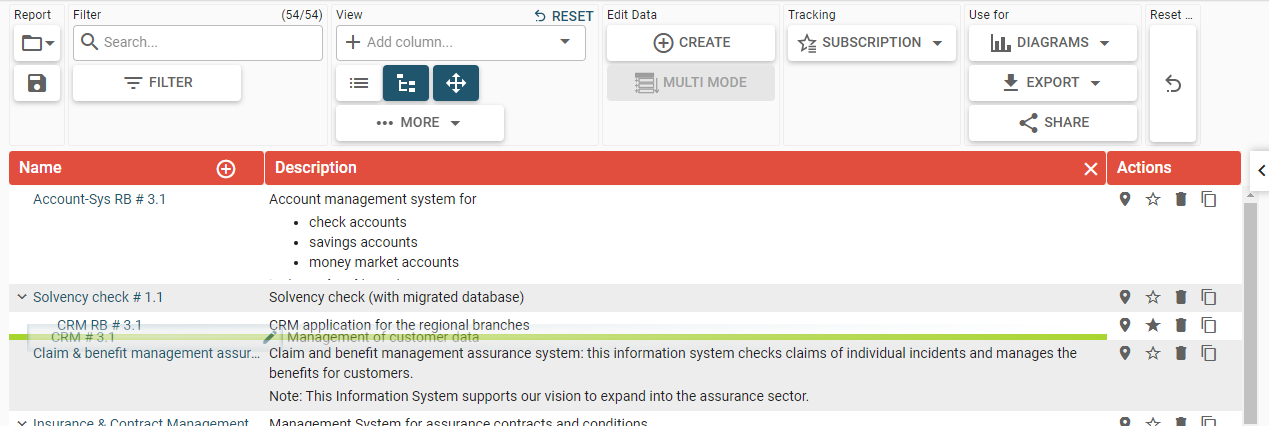
List view
On the "data” tab, all available building block types are shown. Clicking on one of them opens the list view with all elements of that type. The list can be used by several ways:
Create and delete elements
Edit values of different attribute types
Execute bulk updates using multi-mode
Add/remove columns
Filter and reorder results
Show and change the hierarchical structure of elements
The list view can be saved as a report and shared with other users.
Toolbar categories:

Report
Load a report
Save a new report or overwrite the save the existing report with the current settings
Subscribe to a report
Filter
Number of displayed elements and all available elements
Quick search
Filter
Reset button to reset the filter category (only visible if the list is filtered)
View
Add a column
Toggle between
List view mode
Tree view mode (hierarchical structure of the elements)
Activate drag-and-drop
More view options
Show hierarchical names
Collapse all subordinate elements (this menu option is present only if the tree view is activated)
Expand all subordinate elements (this menu option is present only if the tree view is activated)
Reset button in the right upper corner to reset only the view category (only visible if the view is not in the default state)
Edit data
Create new element
Multi-mode (bulk update of elements)
Tracking
History
Subscriptions
Subscribe to this building block type
Shows users subscribed to this building block type
Use for
Diagram
Export the shown list
Share report with other users
Reset the list to the initial configuration
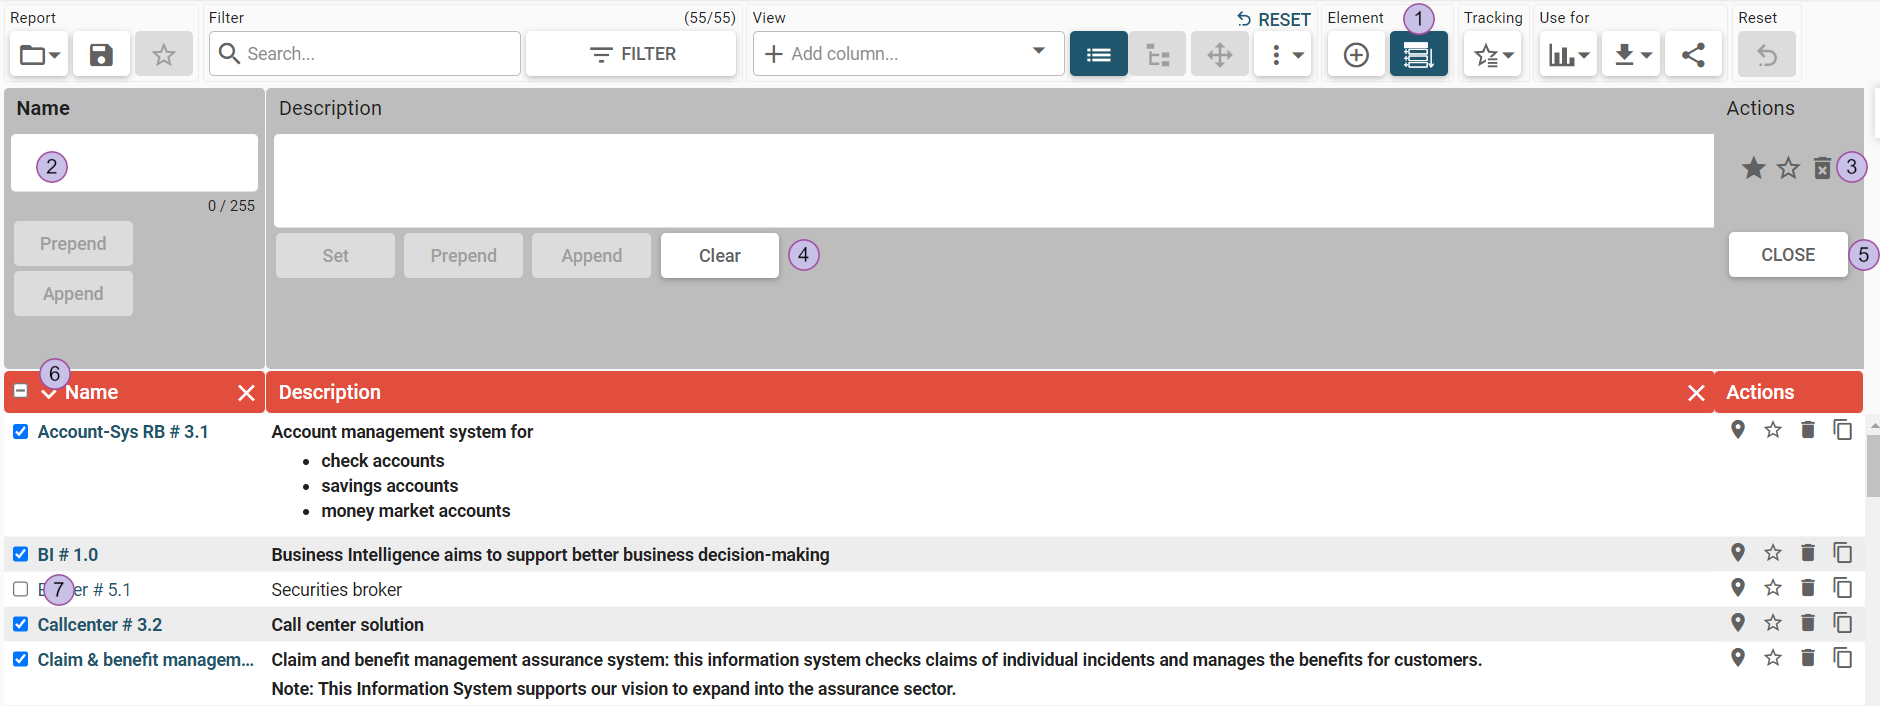
List view results
Actions column
Show in navigator
Subscribe to current element
Delete element
Copy element
Legend with the current list configuration
Keyboard navigation
When working with the list, it is possible to use the keyboard to navigate and edit data:
Arrow keys - navigate the table; the selected cell is highlighted.
F2 - toggles the cell editing mode.
Enter - saves the data when cell is in edit mode.
Shift+Enter - in multiline editor: Adds a new line.
Shift+Alt+N - creates new element.
Ctrl+Enter - saves the new row (same as clicking the check mark button).
Esc - cancels the edit mode.
List view options
Create element
To add a new element, click on the “create" button.
The symbol ":" is not permitted in names as it is used in hierarchical names as a separator.
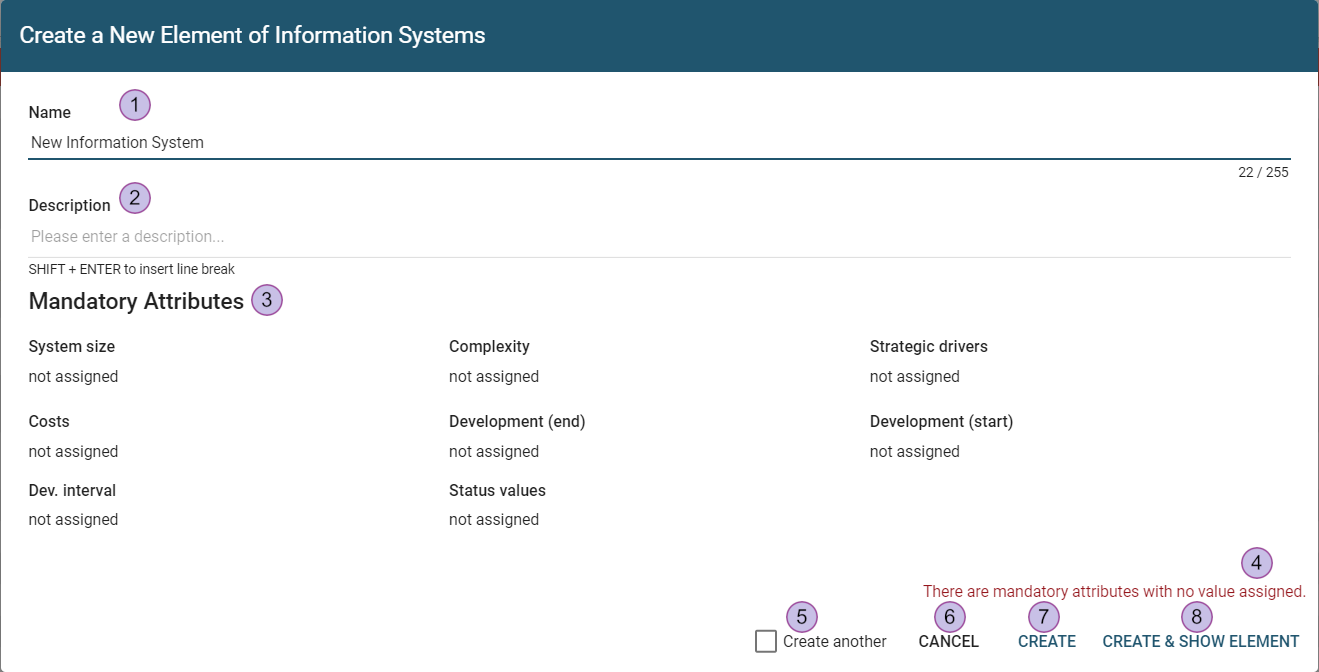
Name (required)
Description
List of mandatory attributes
Warning that there are mandatory attributes that have no value.
Checkbox “create another” is used to reopen the dialog after creating the element
"Cancel" closes the dialog
"Create" saves the entered data as a new element
"Create & show element" opens the single element view after creating an element
Create information flow
The "create" button on the information flow opens a different dialog for creating a new element.
The symbol ":" is not permitted in a name as it is used in hierarchical names as a separator.
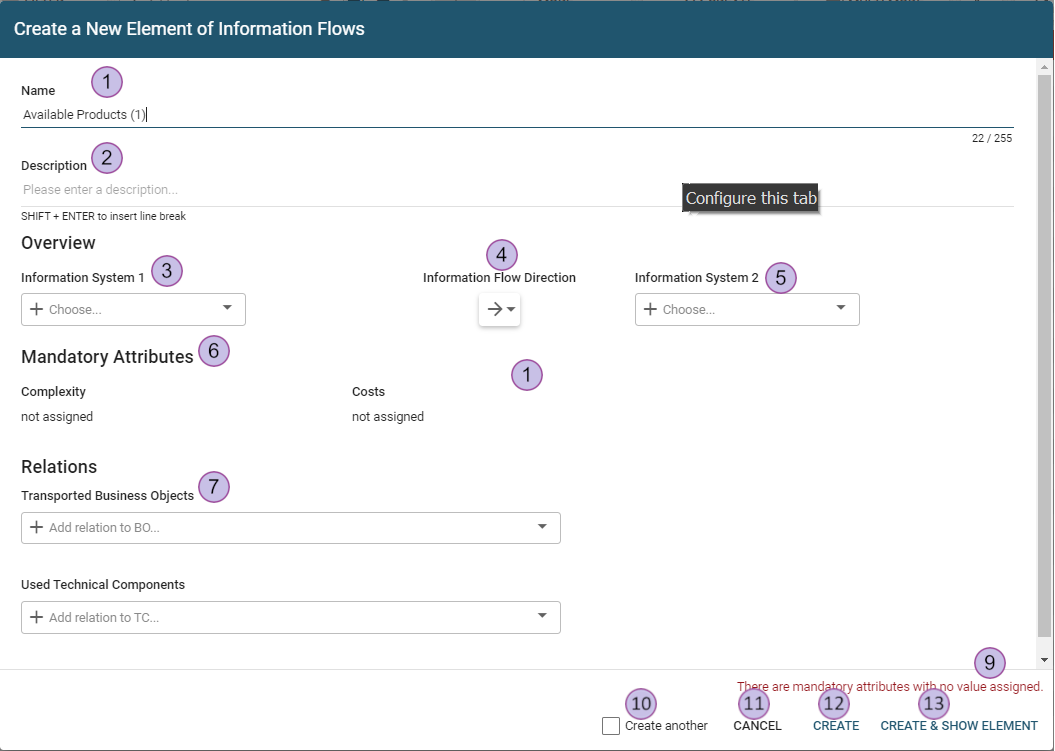
Name (required)
Description
Select an information system for the "information system 1" connection
Information flow direction
Select an information system for the “information system 2" connection
List of mandatory attributes
Add a relation to business objects. If the relation has assigned attributes, they can be set.
Add relation to technical components. If the relation has assigned attributes, they can be set.
Warning that there are mandatory attributes which don’t have value
Checkbox “Create another” is used to reopen the dialog after creating the element
"Cancel" closes the dialog
"Create" saves the entered data as a new element
"Create & show element" opens the single element view after creating an element
Copy element
When copying elements, multiple parts of the element can be included.
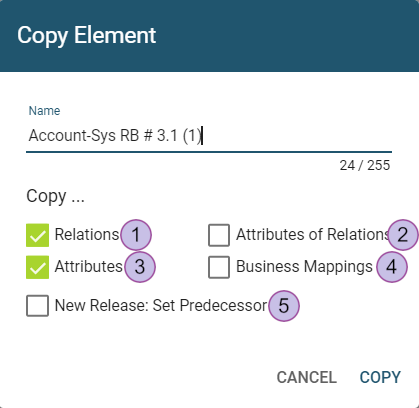
Copy relations (default)
Copy relation attributes (only if “relations” are selected)
Copy all attributes (default)
Copy all business mappings which contain this element
Set the copied element as a predecessor
Delete element
While deleting elements, sub-ordinate elements, or business mappings they are part of can also be deleted.
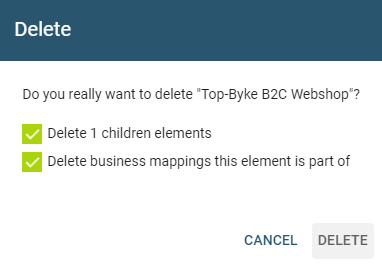
If the "delete X children elements" option is not checked, it will only delete the initially selected element. All its subordinate elements will be moved up in hierarchy.
When both options are checked, business mappings of the deleted subordinate elements will be deleted, too.
Business mappings that become invalid are deleted regardless of the delete permissions of the logged-in user.
Export
By clicking the "export" button in the “use for”-category, the current list will be exported as Excel or CSV. The configuration of the list (visible columns, filters etc.) is taken into account for the export. The naming of the output files is as follows:
Building Block Type_[timestamp].csv
Building Block Type_[timestamp].xlsx
The CSV files have the following format:
"column 1 header";"column 2 header";"column 3 header" ...
"cell content row 1";"column content row 1";"column content row 1" ...
"cell content row 2";"column content row 2";"column content row 2" ...
...
Editing in the list view
To edit a specific row, use the pencil icon that appears when hovering the mouse over the cell.
Edit name and description
These properties are always displayed and can be edited like text attributes.
Edit multiline text attributes
Text attributes can have multiple lines if they are configured as multiline attribute values. XWiki syntax is used in the description field and other multi-line text fields. See here: XWiki syntax
Edit date attributes
Date attributes can be set with a date picker or entered manually. To choose a date in the date picke, click on the calendar icon.
Edit boolean attributes
Boolean attributes values can be set to yes/no or not assigned.
Edit enumeration or responsibility attributes
Enumeration or responsibility attributes can be set with preconfigured values. To add a new item, click below the listing ("add...") and choose the item. In addition, autocomplete is active as well as the search for a specific value. To remove an entry, click on the x next to the value’s name.
Edit date interval attributes
Date attributes can be set with one of the two date pickers or entered manually. If they editor is dsable a start or an end date depends on an assigned date attribute.
Mandatory attributes
An attribute can be set as a "mandatory attribute" in the attribute settings. If it is empty or not assigned, this attribute will be marked in red with an exclamation mark.
Edit self-relations and relations
Self-relations or relations can be added by clicking the listing ("add...") and are selected from the list. In addition, autocomplete is active as well as the search for a specific element. To remove a relation, click on the x next to its name.
Edit business mappings
Business mappings are only editable in the list view of "business mappings" and not in the list view of related elements.
List view filter options
On the list view, there are two ways to filter the displayed elements:
Quick filter
The list can be filtered according to a search term entered in the quick filter search field. The list will then show only elements which contain the search term in one of the visible columns. The quick filter works in addition to the list filter dialogue.
Filter
This button opens the filter dialog to define more complex filters. For details, see filter.
Tree view
The tree view provides a comprehensive overview of the elements and their hierarchical parent-child relations. This feature can be activated by using the "tree view" button in the “view-category”. Buttons for collapse/expand all subordinate elements and drag & drop mode are active in this mode. When drag-and-drop is active, elements are strictly sorted by position and can't be sorted by clicking on a column header.
The hierarchy levels can be collapsed and expanded by clicking the arrow icons in the column “name”.
The state of collapsed and expanded rows is saved and will be restored on your next visit to the list.
Columns and content can still be configured and edited in tree view mode.
Drag-and-drop
Elements in the tree view can be drag-and-dropped so that they change their position in the hierarchy. The dragged element will become a sub-element of the element it is dropped upon.
Dropping an element between two elements puts the dragged element on the same hierarchy-level as the surrounding elements.
List view column options
Add columns
The drop-down menu "add column..." shows all available attributes, self-relations and relations of this building block type.
Delete columns
By clicking the x in the column header, the current column can be deleted. If only one column remains, this column cannot be deleted.
Reorder columns
Columns can be reordered by drag-and-dropping the column headers.
Configure width
The width of columns can be changed by clicking and dragging the boundary between column headers.
Sort by Columns
Clicking on the column name sorts the list by the contents. Clicking again reverses the sorting.
The sorting method depends on the type of column. Numbers, dates and texts are sorted in alphanumerical order. Sorting of enumeration columns is based on the order of enumeration values as defined by the administrator in the attribute's definition.
Multiple level sort
In addition to sorting the list by the contents of a single column, there is also the possibility to sort by multiple columns. For example, you can first sort the list by the column “complexity” and add a secondary sorting by the column “costs”, as follows:
Click on the header of the column "complexity". The list will be sorted by the contents of that column, ascending.
Shift+click on the header of the column "costs". List elements with the same value in "complexity" will be sorted by their "costs" value, in ascending order.
Shift+click on the header of the column "costs" again to change the secondary sorting to descending order.
To remove the multi-level sorting, click on any column header.
Use for diagram
After clicking on “diagrams” button, the list of diagrams appears. If the diagram offers different options to represent the current building block type, all options will be shown in an additional list.
All currently displayed elements in the list will be transferred to the diagram and the filter settings are taken over. Quick filters will be converted to manual selection filters.
Bulk update with multi-mode and combi-create
Multi-mode
Multi-mode is used to edit attribute values or relations for several elements at once. Turning on multi-mode will bring up a panel on the top of the list. With this panel, new values can be entered and applied to all selected rows.
Whenever the tree view mode is active, multi-mode cannot be turned on and vice versa.
Multi-mode
Input field
Subscribe, unsubscribe and delete the selected elements
Apply buttons
Close multi-mode
Select/deselect all rows
Row selection box
For each column in the list an editor is displayed above the list. It is possible to add or remove columns while the multi-mode is active. For read-only fields like id, last modification time, last modification user the multi-mode input field is inactive.
The number of affected rows can be limited with filtering and quick search. Single rows can be individually deselected as well.
The editor input field allows you to enter property value(s). Look and functionality of input fields depends on the attribute type.
The apply buttons depend on their attribute type. They might be enabled or disabled depending on the value entered in the editor. Possible buttons are:
Set - Sets new value. Previous value(s) are overwritten.
Prepend - Add the value entered before the current value. If the resulting text becomes longer than the allowed field length, an error is displayed for that row.
Append - Appends the new value after the current value. The same error as for prepend may occur if the new field length exceeds the allowed number of characters.
Clear - Clears the current value. The attribute type must allow blank values (non-mandatory attributes).
Add - Adds selected value(s) to the set of current values. Available for multi-value enumeration/responsibility attributes and relations.
Remove - Removes selected value(s) from the set of current values. Available for multi-value enumeration/responsibility attributes and relations.
Multi-mode action buttons are used to subscribe and unsubscribe to the selected building blocks and to mass-delete the selected elements.
After performing a bulk update, a summary dialogue is displayed:
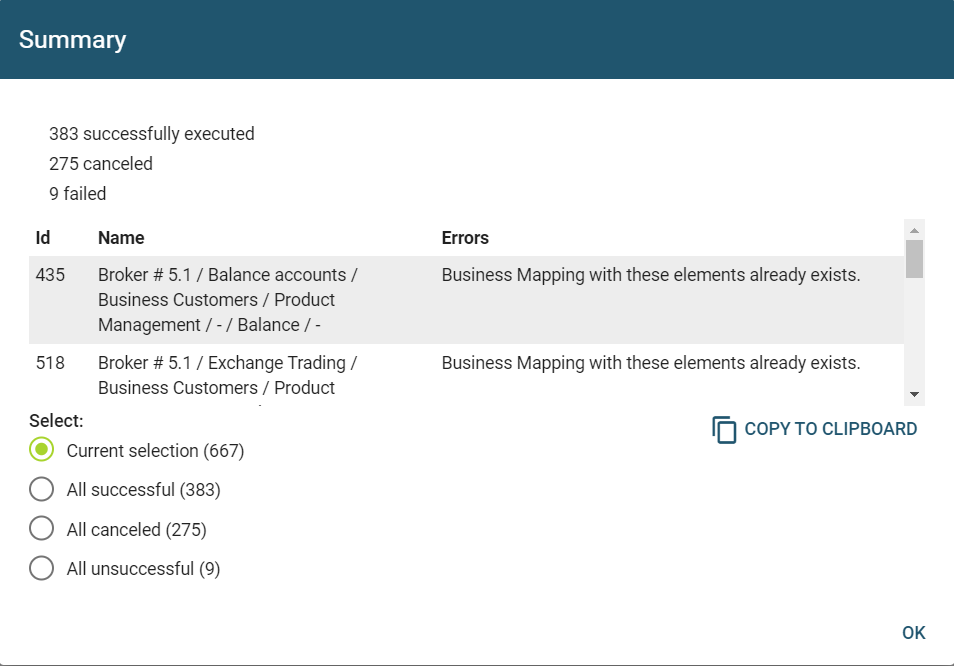
The information in the dialog shows the affected elements and if necessary, this information can be copied using the "copy to clipboard" button. Choose the appropriate selection via the radio buttons. After clicking “ok”, these rows are selected in the list view.
When selecting a large number of elements, mass update may take several minutes to complete. A progress bar will be shown.
Combi-create for business mappings
Combi-create is used to (mass) create and delete Business Mappings. This is done by building the cartesian product of all selected elements.
Turning on combi-create disables the list view options and turns off multi-mode.
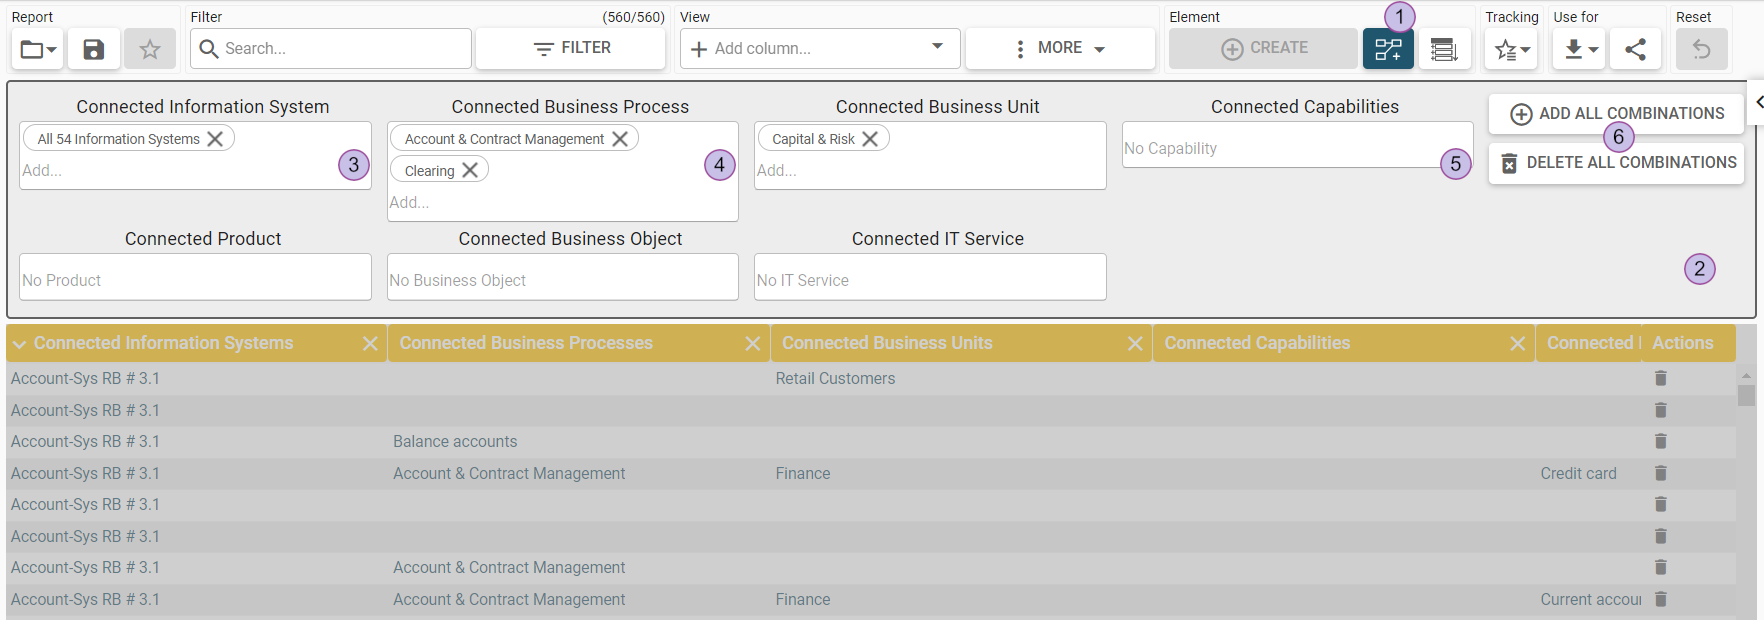
Combi-create
Combi-create editor contains up to seven input fields for business mapping relations
“All connected relations” or specific ones can be selected from the drop-down
“All connected relations” or specific ones can be selected from the drop-down
“All connected relations” or specific ones can be selected from the drop-down
“Add all combinations” creates a new set of business mappings with all possible combinations of the selected relations
”Delete all combinations” finds and deletes all business mappings, considering the cartesian product of the selected relations.
To create business mappings, you have to choose at least two elements from two distinct relations. To add a new element, click below the listing ("add...") and choose the item. With the option “all instances” you can quickly select all building blocks of this type. In addition, autocomplete is active and searching for a specific value. To remove an entry, click on the x next to the value’s name.
By clicking 'add all combinations', a set of business mappings will be created with all possible connections of the selected elements. For example:
Connected information systems | Connected business proccesses | Connected business units | Connected products | Connected capabilities | Connected business objects | Connected IT services |
|---|---|---|---|---|---|---|
Account-Sys RB #3.1 | Controlling | Capital & risk | No products | No capabilities | No business objects | No IT services |
BI # 1.0 | Core |
creates a set of 4 business mappings:
Connected information systems | Connected business proccesses | Connected business units | Connected products | Connected capabilities | Connected business objects | Connected IT services |
|---|---|---|---|---|---|---|
Account-Sys RB #3.1 | Controlling | Capital & risk | - | - | - | - |
Account-Sys RB #3.1 | Core | Capital & risk | - | - | - | - |
BI # 1.0 | Controlling | Capital & risk | - | - | - | - |
BI # 1.0 | Core | Capital & risk | - | - | - | - |
By clicking “delete all combinations”, all possible (and existing) combinations of the selected elements are deleted. After executing this, a summary screen is shown.
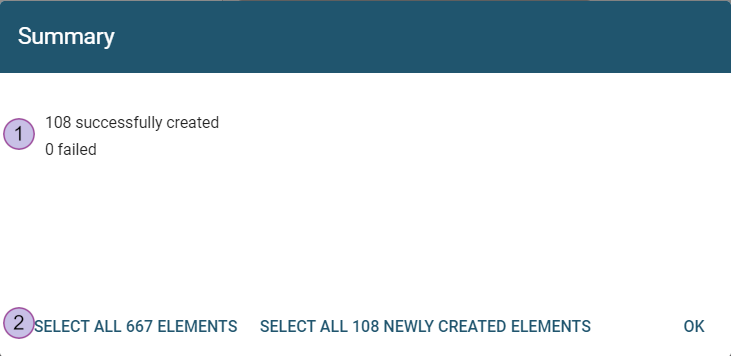
The button 'select all X elements' opens multi-mode with all existing elements selected. The button 'select all XXX newly created elements' opens multi-mode with the just created elements selected.
Building block history
By clicking on the "history" button in the “tracking-category”, it is possible to open the history of the current building block list. In the "history" dialog, all changes for the building block elements are listed, like creation, deletion, attribute assignment and removal as well as the enabling and disabling of the historization feature.
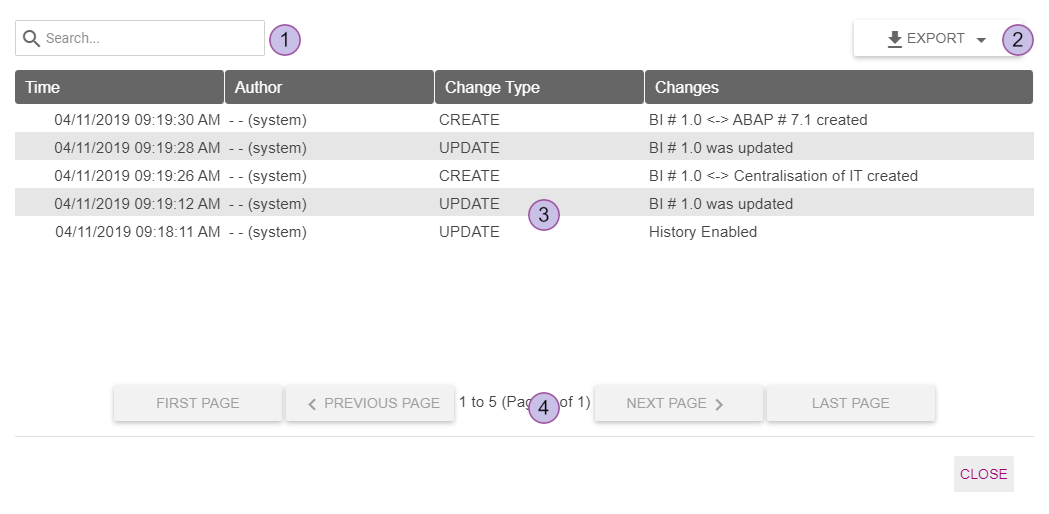
Filter the history (quick search)
Export the history in CSV or Excel format
Shows the type of change
Provides navigation (switch between pages)
If there are a lot of entries, the history can take longer to load. The number of shown entries can be configured.