Single element view
The single element view shows all information about an element. It is available for all building block types, except business mappings. The single element view can be accessed from the list view and from any diagram by clicking on the name or id of an element.
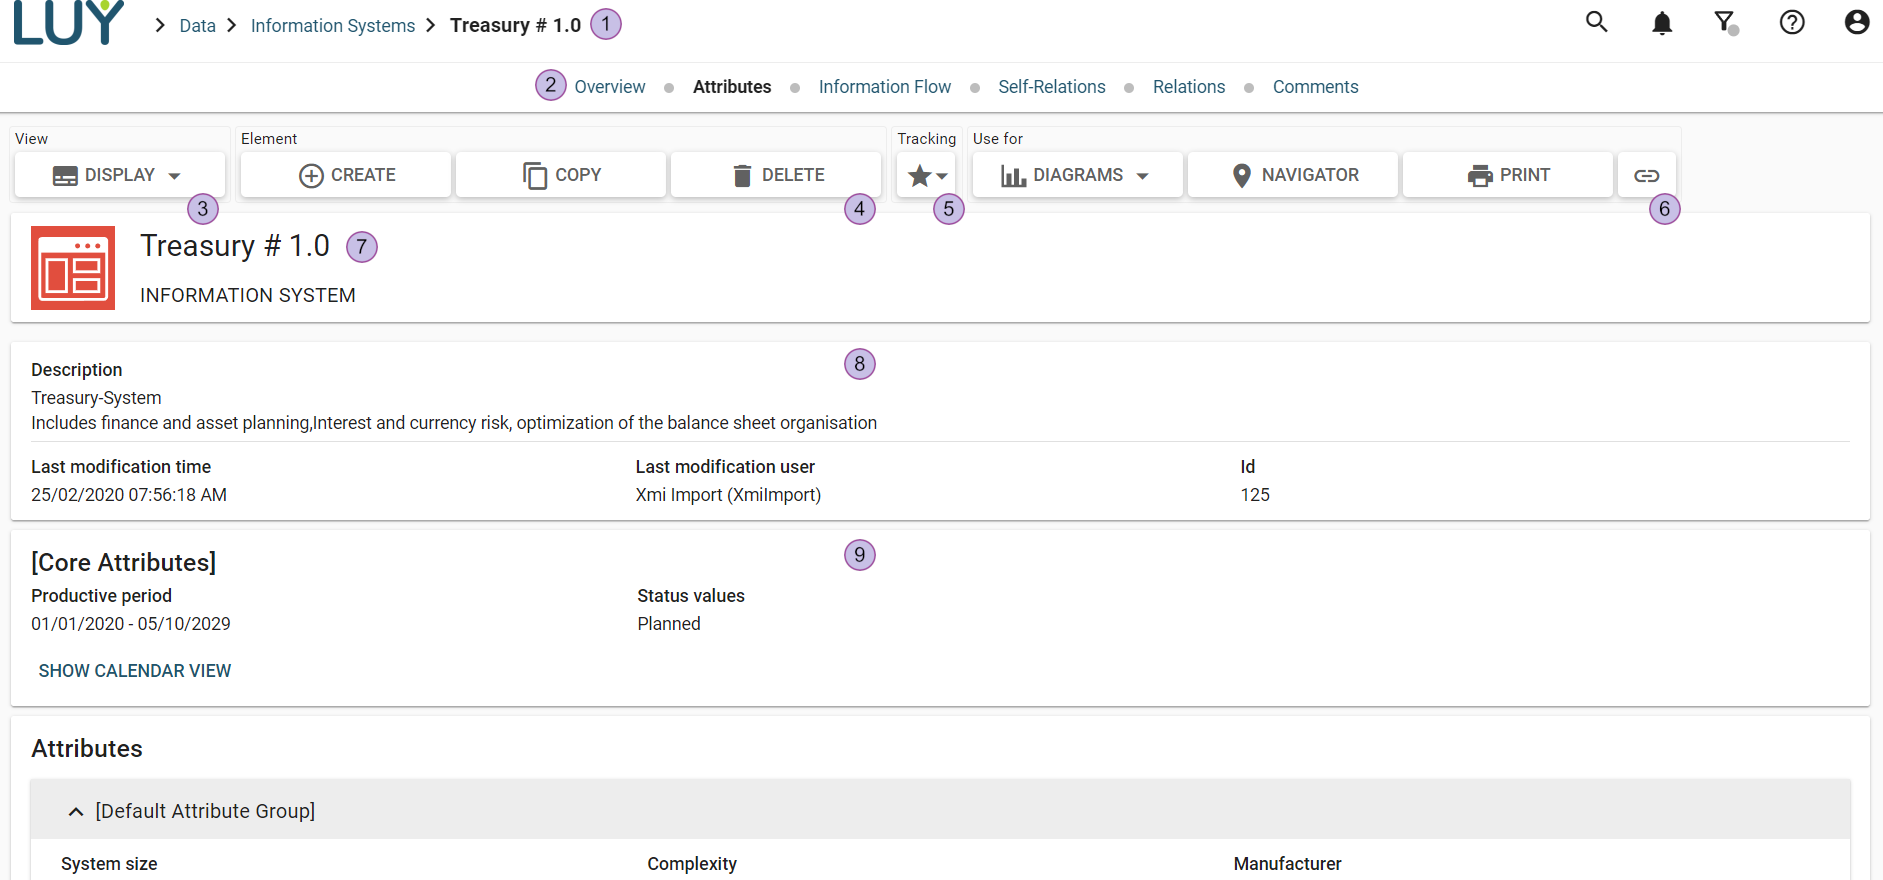
Breadcrumb navigation
Page navigation panel
View
Display options:
Show every element in a new line or next to each other to display attributes, self-relations and relations accordingly
Show hierarchical names or non-hierarchical names
Element
Create a new element
Copy this element
Delete this element
Tracking
Subscription:
Subscribe to this element
Show subscribed users for this element
Use for
Use this element in diagrams
Use this element in the navigator
Print current page
Copy URL to clipboard
The name of this element and building block type
Overview card with description, last modification time and user, and ID
Top-level user-defined attribute groups
Page navigation
The information on the single element view is grouped into these sections: overview, attributes, self-relations, relations, comments, history. By clicking on a section, the page jumps to the selected section.
The name of the selected section is marked bold black:

Sections that have empty/not assigned mandatory attributes are emphasized with an exclamation mark.
Attribute groups
The “attribute” section displays all attributes which are assigned to this building block, organized into attribute groups.
Editing in the single element view
Attributes can be edited by clicking on the value or the pencil icon. The new value(s) can be entered in the editor and changes are saved after clicking on the check mark icon or discarded when clicking on the x-icon.
Edit name and description
These properties are always displayed and can be edited just like text attributes.
Edit multiline text attributes
Text attributes can have multiple lines if they are configured for multi-line attribute values. XWiki syntax is used in the description field and other multi-line text fields. See here: XWiki syntax.
Edit date attributes
Date attributes can be set with a date picker or entered manually. To choose a date in the date picker, click on the calendar icon.
Edit boolean attributes
Boolean attributes values can be set to yes/no or not assigned.
Edit enumeration and responsibility attributes
Enumeration and responsibility attributes can be set with preconfigured values. To add a new item, click below the listing ("add...") and choose the item. In addition, autocomplete is active as well as the search for a specific value. To remove an entry, click on the x next to the value’s name.
Edit date interval attributes
Date attributes can be set with one of the two date pickers or entered manually. Whether the editor displays a start or an end date depends on an assigned date attribute.
Mandatory attributes
An attribute can be declared as "mandatory" in the attribute settings. If it is left empty, this attribute will be marked in red with an exclamation mark.
Use for diagram
After clicking on the button, the diagram list appears. If a diagram offers different options to represent the current building block type, these options will be shown in an additional list.
Calendar view
If an attribute group has at least one date interval and/or date attribute the calendar view is visible. By default, the calendar view is collapsed, and by clicking on the button “show calendar view” it is expanded.
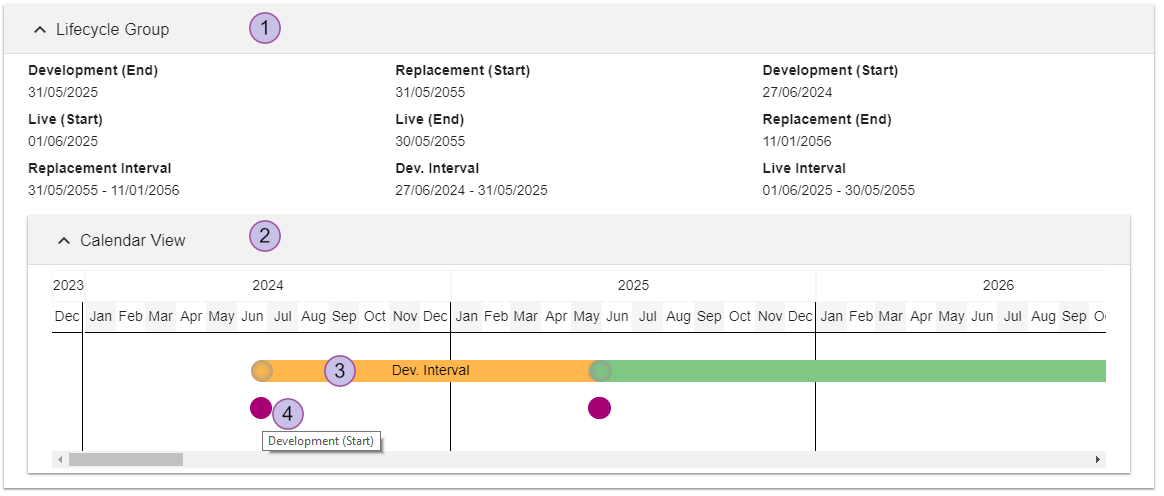
Attribute group
Calendar view (expanded) with all date intervals and date attributes. The range of the calendar is limited to 30 years in the past and 30 years in the future based on the current date. Everything outside of this range is cut off. If all date and duration values are set outside of this range, the calendar view is not displayed at all.
Date intervals are shown in the set color of the attribute. A tooltip with the attribute name is displayed when hovering over an entry.
Date attribute: Hovering over the date attribute shows a tooltip with the attribute name.
Editing relations
Relations or self-relations can be added by using the field "add relation" or "add self-relation" on top of the corresponding relation section. A building block name can be selected from the dropdown. Relations can be filtered by selecting a building block type from the list. To select a building block type via the text field of the dropdown list, enter the abbreviation (e.g., "BP") and confirm with enter.
Self-relations and relations can be filtered by using the filter dialog. It is also possible to add a new relation by hovering over the related BBT section and selecting the relation via the drop down.
Self-relations
Self-relations are relations between elements of the same building block type. These are, for example, parent-child relations such as predecessor - successor.
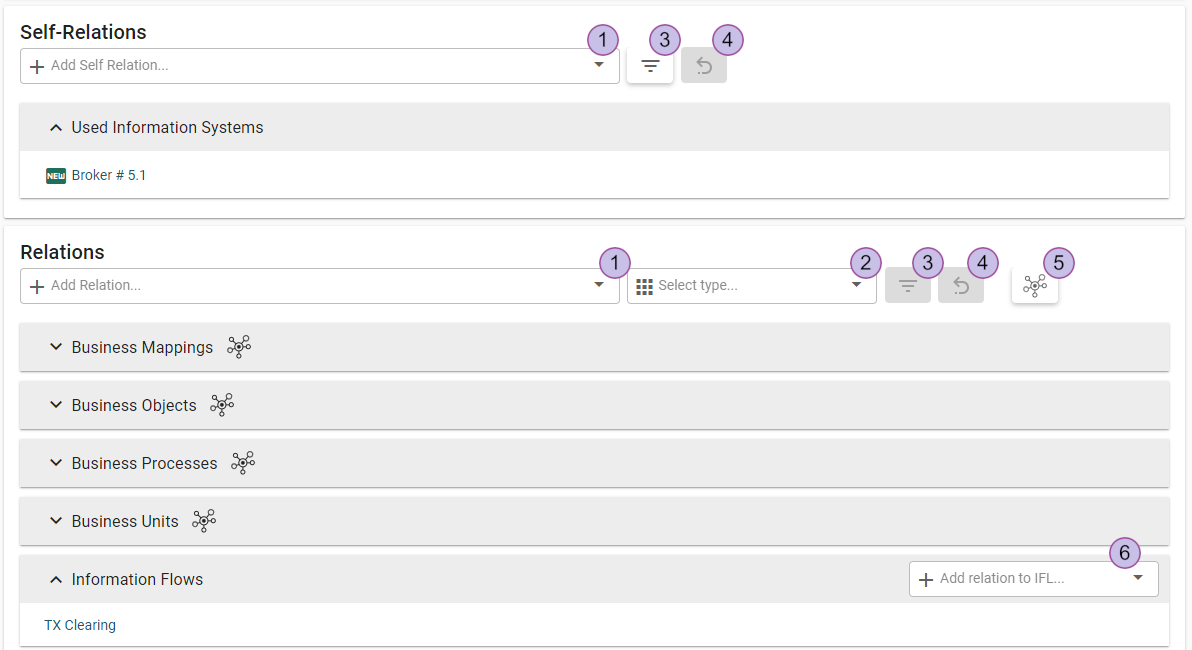
Dropdown list containing all elements that could be related with the current element
Dropdown list containing related building block types
Filter concerning the available elements in the drop down
Reset button for filter and type
Add business mapping
Dropdown list for adding a relation to this element
When you select self-relations, a dialog opens in which the desired relation-type can be chosen. Inactive self-relations are not available: for example, if the self-relation already exists, if their counterpart already exists or if this element can only have one self-relation of this type and it already has one.
With information systems you can also choose "connect via information flow". A new dialog opens, in which “information system 2” contains the selected information system and "information system 1" contains the name of the displayed element. The name of the information flow is generated.
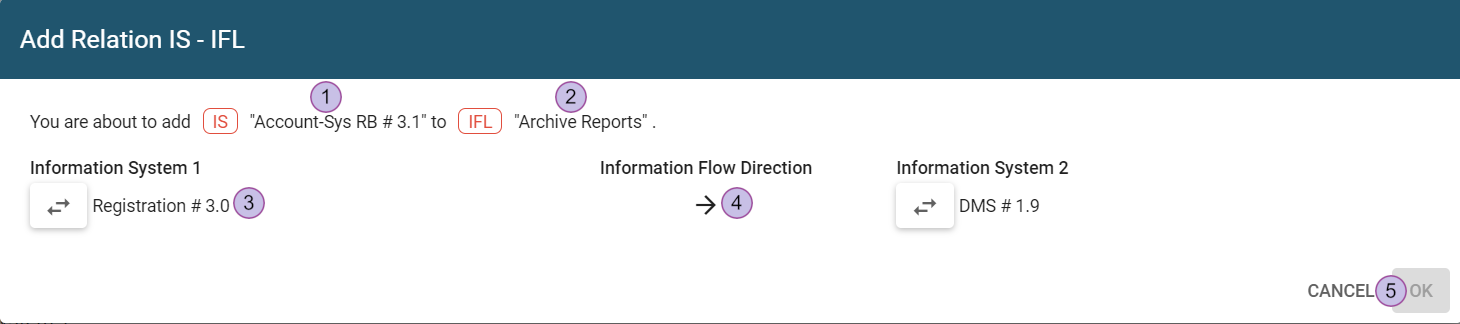
Relation to the information system element
Relation to the information flow element
Add- or replace-button
Add-button if the information flow has no relation
Replace-button with information system name if the information flow has a relation
Shows the information flow direction of (2)
Action buttons
"Cancel" withdraws all selections and closes the dialog
"OK" is disabled, if no add-/replace-button (3) is highlighted; "replace" is shown instead of "OK", if a replace-button is highlighted; "add" - is shown instead of "OK", if an add-button is highlighted
When adding a relation, only the last modification time of the information system is changed, for example, if a connection to a project in the single element view of an information system is added. Only one self-relation can be added at a time.
After selecting a self-relation from the dropdown menu, an "add self-relation" dialog like this will appear:
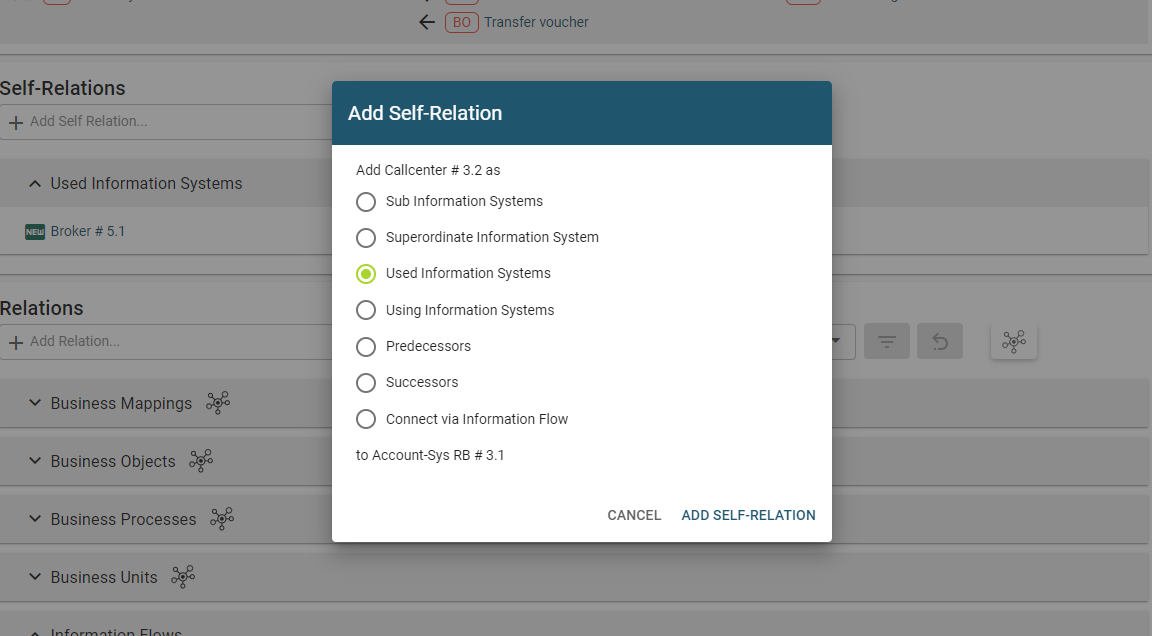
Possible scenarios
Already existing self-relation: If a self-relation to this element already exists, this option is disabled.
Preventing cyclic relations: A relation cannot be set as a successor if it already is set as a predecessor. Then, the option is disabled.
One superordinate element or parent: An element can only have one parent relation.
Many subordinate elements or predecessors, successors, used or using: An element can have multiple elements as subordinate elements or predecessors, successors, used, using.
Generalization of business objects: A business object can only have one specialized business object, but many specializing business objects.
Deleting relations
Most relations can also be deleted in the single element view. This can be done by clicking the trash can icon that appears by hovering over the relation.
Information flows
This section is available only for the single element view of information systems. The list shows the direction between information system 1 and information system 2 as well as the list of transported business objects with the respective direction and its used technical components.
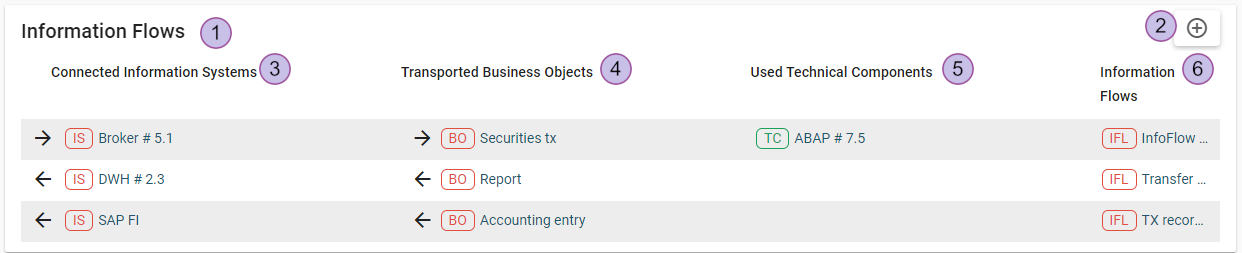
Header of this section
Create a new information flow
List of connected information systems
List of related business objects with their respective direction to the current information flow
List of related technical components of the information flow
Name of the information flow
History
The history section is displayed only if data historization is enabled.
The “changes” column contains records about different types of changes to the element:
An attribute change is displayed in the format "old value" -> "new value". Multiple-type attributes are displayed with a "+" and "-" prefix for the added and removed values respectively.
An update of related objects is displayed with a "+" prefix when an object is added, removed objects with "-" prefix.
Added or removed attributable relations are displayed with "+" or "-". Updates of attributes of such relations are displayed with the pencil icon in front of a related item name and the list of attribute updates after the name in the same format as usual attributes updates.
If a created history entry is too long for the history table, the entry may be shortened. The entry can be expanded by a double click.
Comments
The comments section is displayed only if the commenting feature is enabled.
It is possible to leave a comment message for a certain element and to read other users comments. The comments support the XWiki syntax.
Comments cannot be edited, but users are able to delete their own comments. Users with the superuser role can delete all comments. Whenever a building block is deleted, all comments are deleted with it.