Table view
Clicking on a building block type or business mapping opens the table view of the chosen types, where all elements of that type are displayed. The table provides several powerful features:
Adding or removing columns: Add attributes, relations, relation attributes, and business mappings as columns to display more detailed information in the table.
Edit attributes: Modify values for different attribute types via double-click.
Filter data: Apply filters to display only the elements that match specific criteria, making it easier to focus on relevant data.
Hierarchy: Enable hierarchy mode to display the hierarchical structure of the elements.
Table reports: Open, create, edit, delete, or share table reports with other users to manage and collaborate on table configurations effectively.
Quick search bar: Quickly locate specific elements within the table.
Undo and redo: Reverse or reapply recent changes in the table.
Interacting with the report table: Rearrange columns, adjust their size, and sort the data within them to customize the table view and prioritize the most important information.
View options: Customize the table view by displaying the hierarchical structure of elements and adjusting the table layout.
In LUY Nova, creating, editing, or deleting relations, or business mappings is not yet supported. To perform these actions, use LUY Classic. Future updates to these features will be reflected here and documented in our Release notes - cloud.
Adding or removing columns
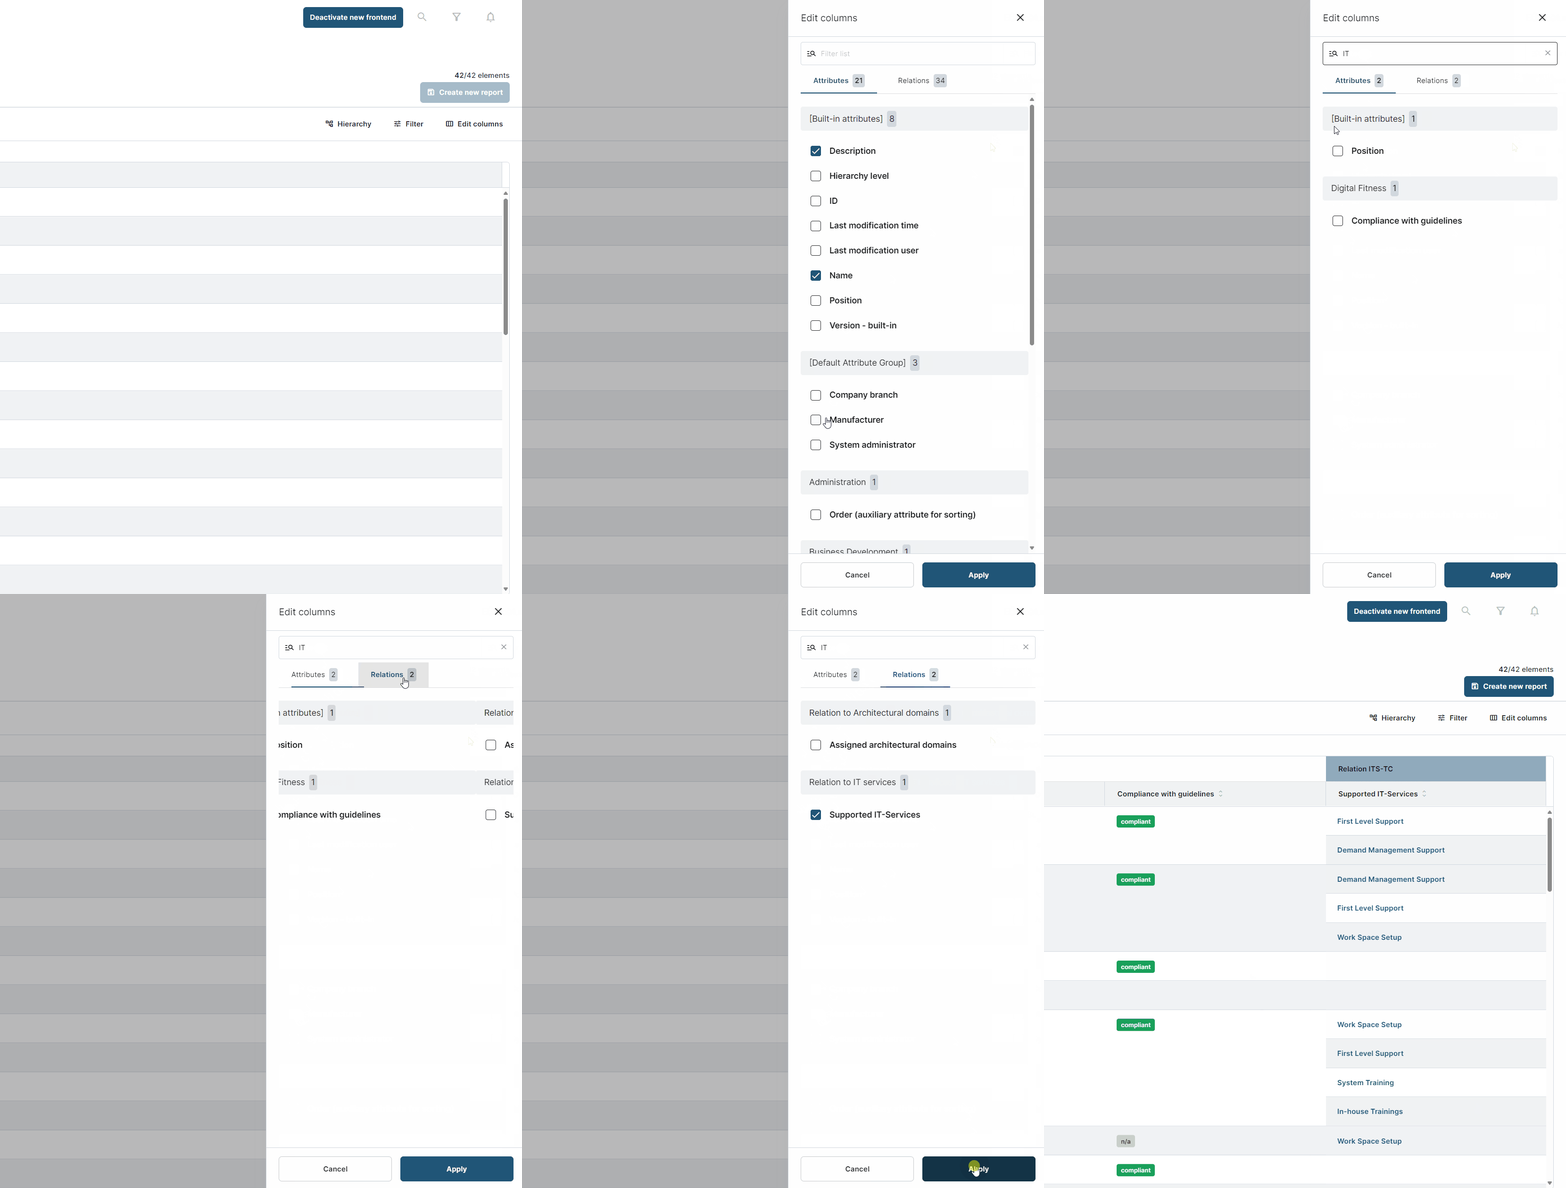
Clicking the "Edit columns" button opens a sidebar menu where users can add or remove columns. In the sidebar, users can check or uncheck attributes to select which ones should be displayed in the report table. To apply the changes, click the "Apply" button.
The "Edit columns" menu is divided into an "Attributes" and "Relations" tab, providing a clear separation to help users quickly locate the desired attribute.
Attributes: The "Attributes" tab lists all attributes, organized by attribute groups directly assigned to the building block.
Relations: The "Relations" tab contains all relation and business mapping related attributes.
Search for attributes or relations
The "Filter list" search bar allows users to quickly locate attributes or relations by searching for full or partial names. The number of matching results is displayed in the "Attributes" and "Relations" tab headers. The search spans both tabs, allowing users to seamlessly switch between them to view the corresponding results.
Edit attributes
Double-clicking on a cell opens the edit dialog, allowing modifications to the specific element. To save changes click on another cell in the table or use the “Save” button.

Building block names:
Building blocks can be renamed in the table view. To do so, double click on the cell with the name - but not on the link to the building block’s single element view. LUY’s editor verifies that the name is not empty, complies to the maximum length of 255 characters and does not allow duplicate names. For technical reasons, name duplicates are checked after clicking on the save button. In case of a duplicate, LUY will throw an error toast and resets the name to its previous state.Enumeration and responsibility attributes:
These attributes can be set using preconfigured values. To set a value, select the desired entry. Autocomplete and search features are available to quickly locate specific values. If "multiple values" is active for the attribute, multiple values can be added. To remove an entry, click the "x" next to the value’s name.Numeric attributes:
Numeric values can be entered directly. If an “Upper” or “Lower” bound is set, the info will be displayed in the edit dialog. Numeric values outside the specified bounds cannot be saved.Date attributes:
Date values can be set using the date picker or entered manually. To select a date using the date picker, click on the calendar icon.Date interval attributes:
Date intervals can be set using two date pickers or by manual entry. If start and/or end date are set to reflect an assigned single date attribute, editing the date is disabled and a mouse over shows the reflected attribute name.Boolean attributes:
Boolean attributes can be set to “Yes”, “No”, or “Not assigned”. If “Not assigned” is selected, the field will appear empty.Text attributes:
Plain text attributes can contain up to 255 characters and don’t allow any formatting.
An attribute can be set as a "mandatory attribute" in the attribute settings. Empty or not assigned mandatory attributes will be marked in red with an exclamation mark in the table view and single element view.
Multiline text attributes:
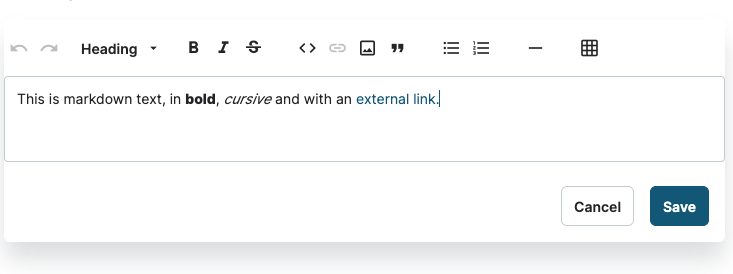
Multiline text attributes and descriptions, a default attribute for every building block type in LUY, can contain more text than a plain text attribute. You can use different formatting options provided in the editor’s toolbar:
To start editing:
Double-click on a multiline text field.
The editor’s toolbar appears at the top, offering formatting options.
Begin typing in Markdown syntax or use the toolbar for quick formatting.
Click Save to apply your changes.
Text formatting
The editor supports various Markdown elements for text formatting, lists, tables, links, images, and more.
Formatting | Syntax example | Rendered output |
|---|---|---|
Bold |
| LUY markdown |
Italic |
| Markdown editor |
Strike through |
|
|
Code snippet |
|
|
Quotes |
|  |
Bullet lists |
CODE
|
|
Numbered lists |
CODE
|
|
Tables |
CODE
|  |
Links |
| |
Images |
|
LUY Logo |
Horizontal rules |
|  |
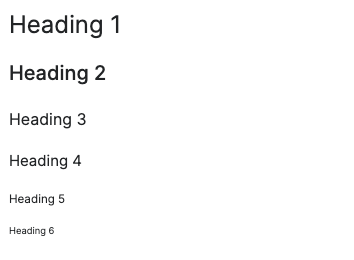
Headings 1-6 |
CODE
|  |
Paragraph This is your default text style. | paragraph | paragraph |
Accessibility and keyboard navigation:
Tab: Tab moves the cursor to the next interactive element, except in lists where it creates a new indentation.
Shift+Tab: Moves the focus to the previous toolbar button.
Enhanced copy-paste support:
Copying between LUY Markdown editors preserves formatting.
When pasting from external tools (JIRA, Confluence, Word, etc.) formatting is retained as closely as possible.
When pasting into tables only plain text is retained to prevent breaking structure.
Limitations:
Line breaks in tables are not supported. Tables must contain only inline elements.
Dragging images into the editor is not supported. Only external image links are allowed.
Edit relations
In the table view, relations can be added as columns. However, relations and business mappings cannot yet be created or edited directly in the table view. To perform these actions, use LUY Classic. Updates to these features will be reflected here and documented in our Release notes - cloud.
Filter elements
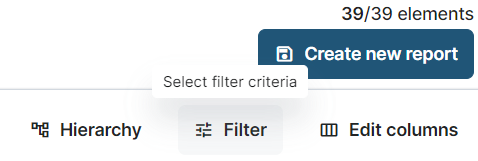
For filtering entries in the table view, users can apply a filter with various criteria to achieve the desired end result. To set or edit a filter, click the "Filter" button, or select "Filter report" in the "Edit" menu. Either action opens the filter dialog. Detailed instructions on using filters can be found on the page Advanced filter .
Hierarchy
The "Hierarchy" provides a comprehensive overview of elements and their hierarchical parent-child relationships. Activate this feature by clicking the "Hierarchy" button or selecting "Hierarchy" in the "View" menu.
Hierarchy levels can be collapsed and expanded by clicking the arrow icons in the "Name" column. The collapsed and expanded states are saved as part of the table report.
Columns and content can still be configured and edited while the “Hierarchy” is active.
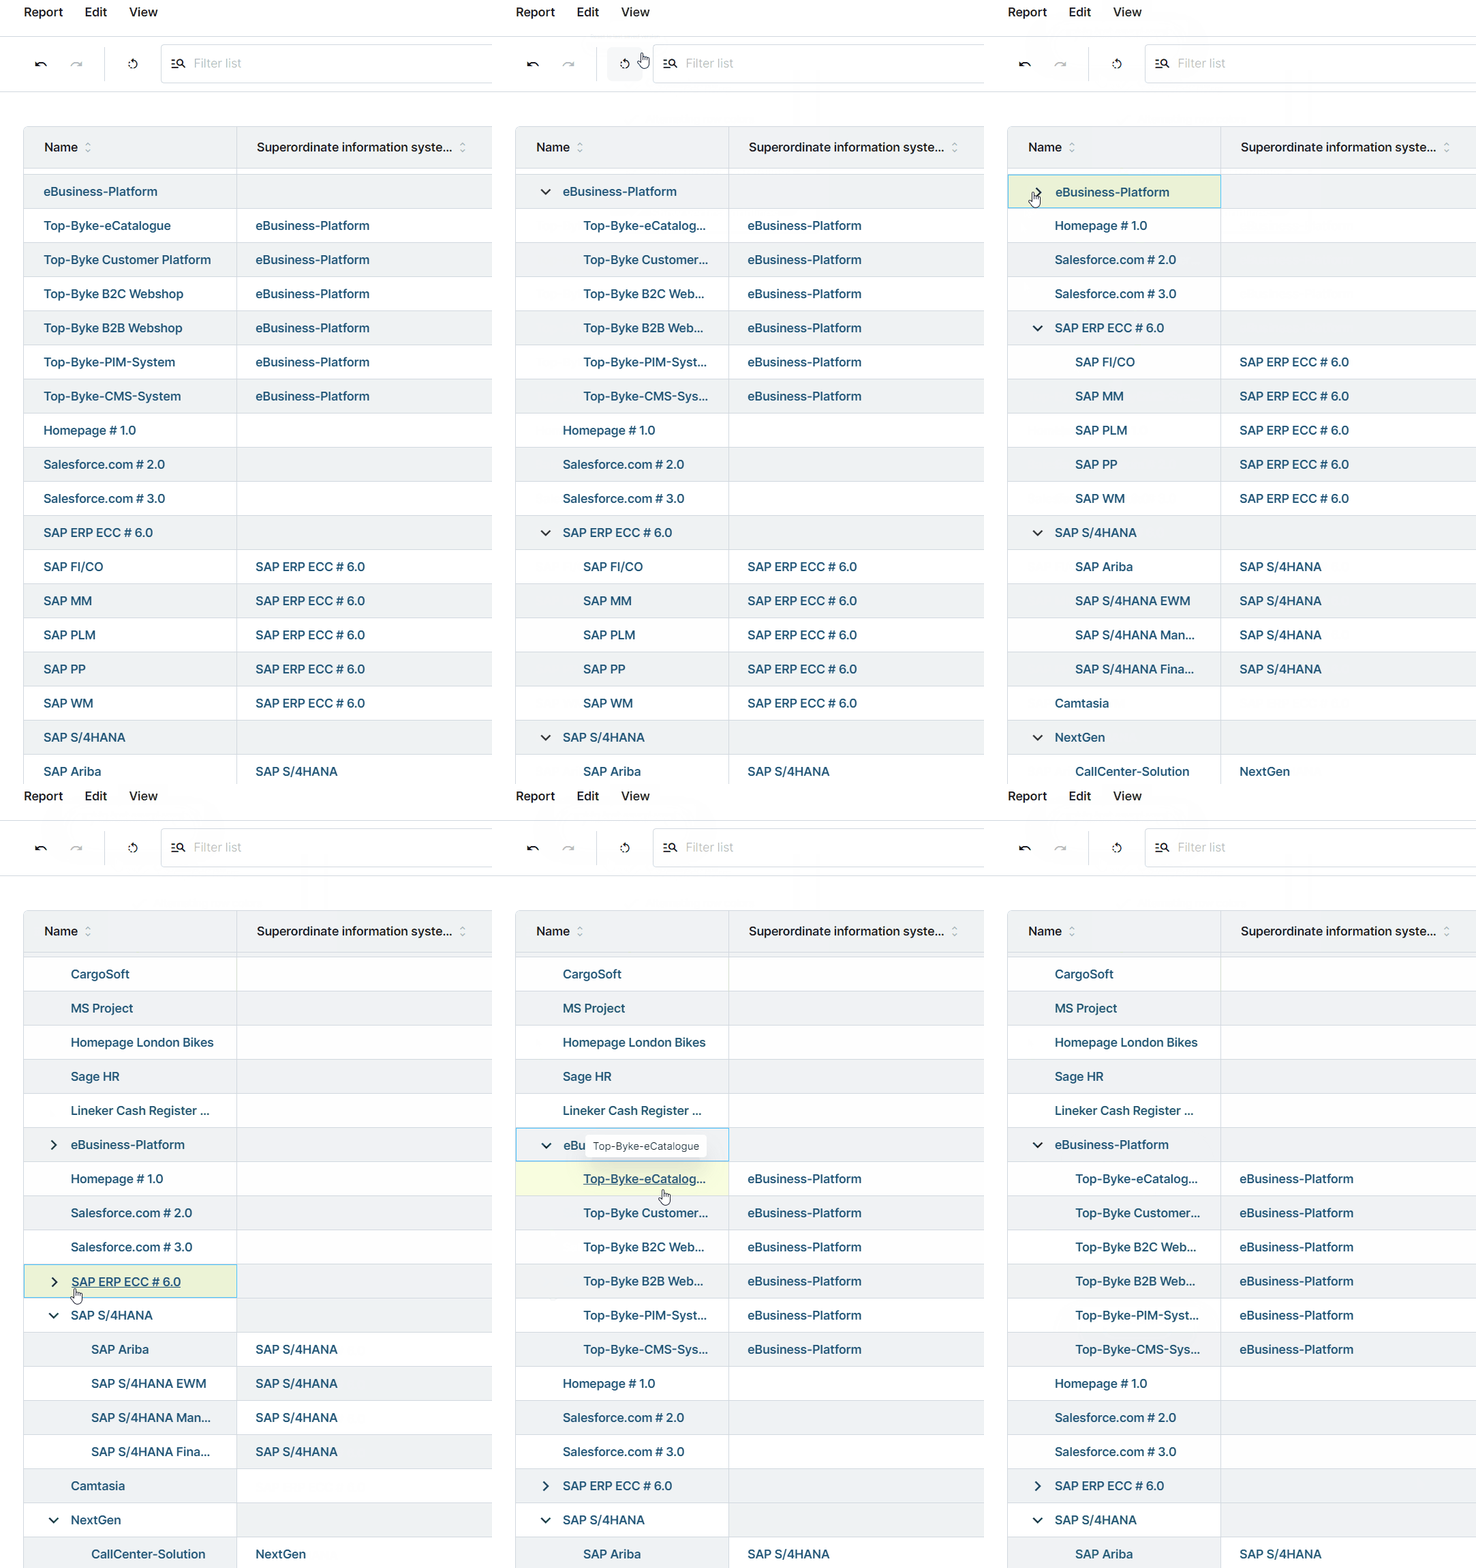
Table reports
In the table view, all shared and personal table reports can be opened, created, edited, deleted, and shared with other users. The default table view after clicking on a builidng block type in the meta model is not a report but a list of all available elements. Of course, it can be adjusted and saved as a report.
Open table report
To open an existing report, click "Open" in the "Report" menu. The report dialog displays all shared and personal reports available to the user for the selected building block type.
Once a report is loaded, all configured options for the table view are applied, and the title changes from, for example, "Information system" to the name of the report.

It is possible to open multiple table reports in parallel in separate browser tabs by right-clicking on a report and selecting "Open link in new tab." This allows for easier comparison of reports.
Filter reports
The search dialog “Filter reports” allows for quickly finding reports by searching for an author or for the report name, simplifying the process of locating the desired report.

Sorting reports
The displayed reports can be sorted by clicking on the column headers “Name, “Author”, or “Date”. This feature enables easy organization of the reports based on the selected attribute.
Reset report
After changes are made to an open report, the "Reset to Last Saved Version" function or the "Reset" entry in the "Report" menu becomes active. Clicking either option reverts the report to its last saved state.

Before the reset is executed, a dialog appears with the message: "Are you sure you want to reset this report?". Clicking "Reset" confirms the action and restores the report to its previous state.
Another way to return to the initial state of a loaded report is by using the "Undo" function repeatedly until the initial state is restored.
Create table report
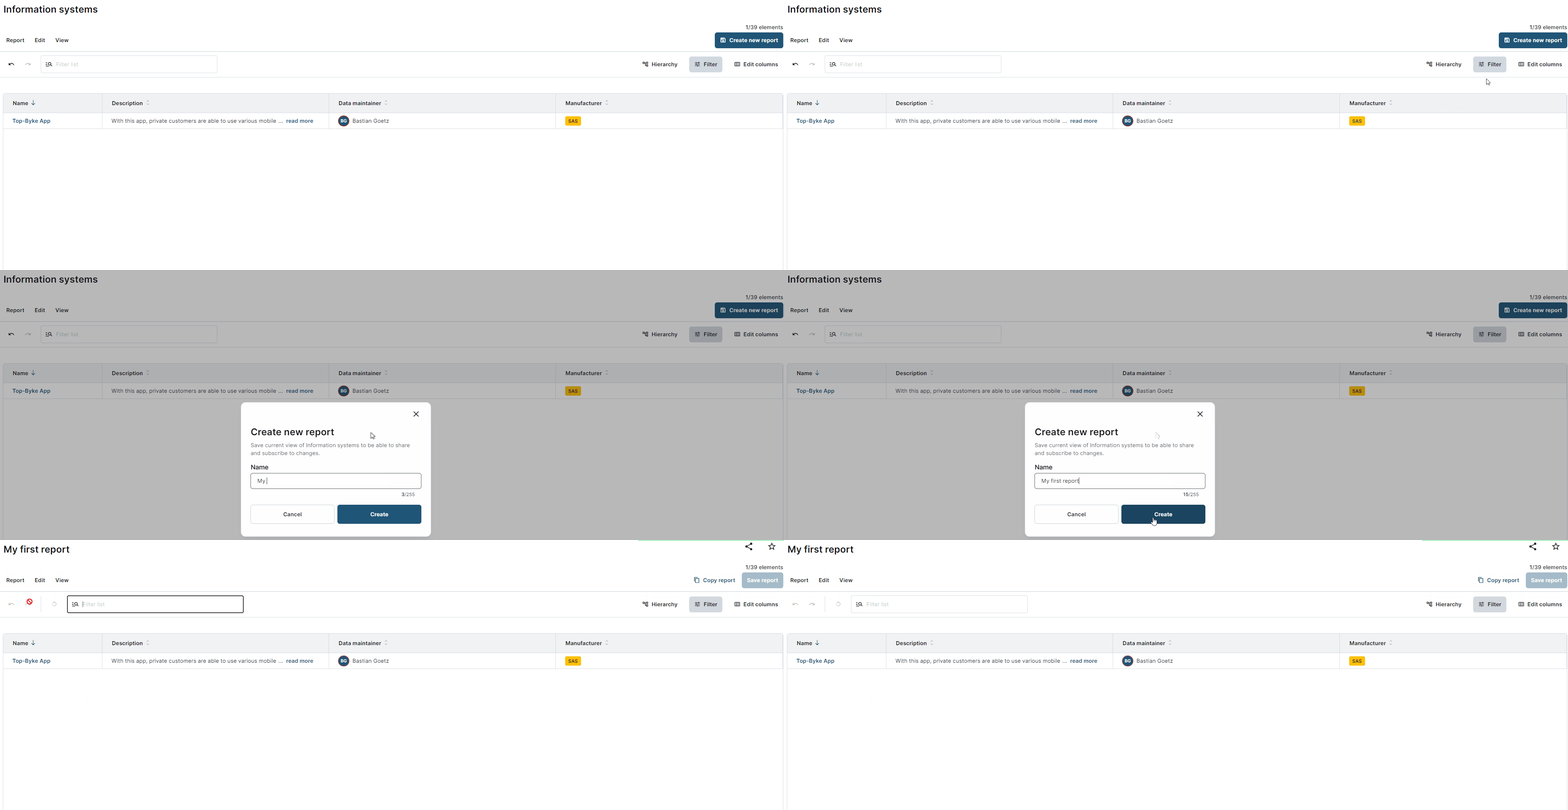
When coming from the default table view of a building block: to save the current table view configuration as a report for future use, click the "Create New Report" button or select "Create New Report" from the "Report" menu. This allows you to preserve the setup, including filters, column configurations, and sorting, enabling quick access to the same table view whenever needed.
After clicking "Create New Report", the "Create New Report" dialog opens. Enter a name for the report and complete the process by clicking on the button “Create”.
Once a report is created, all configured options for the table view remain applied, and the title changes from, for example, "Information system" to the specified name of the report.
Update a table report
After changes are made to an open table view report, the "Save report" button becomes active. Clicking the "Save report" button or selecting "Save" from the "Report" menu saves all changes.
If the user loads a shared report without “Edit” or “Owner” permissions, it will not be possible to save changes to this report.
In this case, it is possible to save the report as a copy, thereby saving all changes in the copy of the original report.
Additionally, if the user navigates to a different section or switches to the single-element view in LUY, a dialog titled "You made changes to this table report" will appear, informing them of unsaved changes.
If the user loads a shared report with "Edit" or "Owner" permissions, saving will apply the changes directly to the shared report.
Copy a table report
Clicking the "Copy report" button or selecting "Copy" from the "Report" menu duplicates the currently loaded report, creating a new report containing all unsaved changes made to the original report. After clicking, the "Copy Report" dialog opens, allowing the user to enter a new report “Name”.
Once a report is copied, all configured options for the table view remain applied, and the title changes, for example, from "Information system" to the newly specified name of the copied report.
Share table reports
To share a table report with other LUY users, user groups, or roles, click "Share" in the "Report" menu or the “share” icon top right.
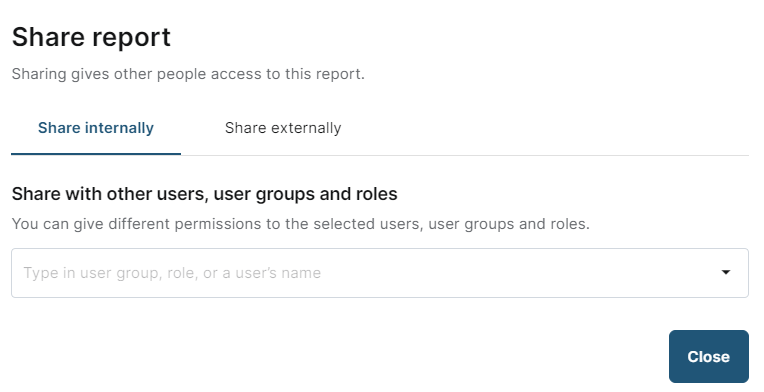
This opens the "Share Report" dialog, which contains two tabs: "Share internally" and
"Share externally".
Share internally
In the "Share internally" tab, users can share their table report with other LUY users, user groups, or roles.
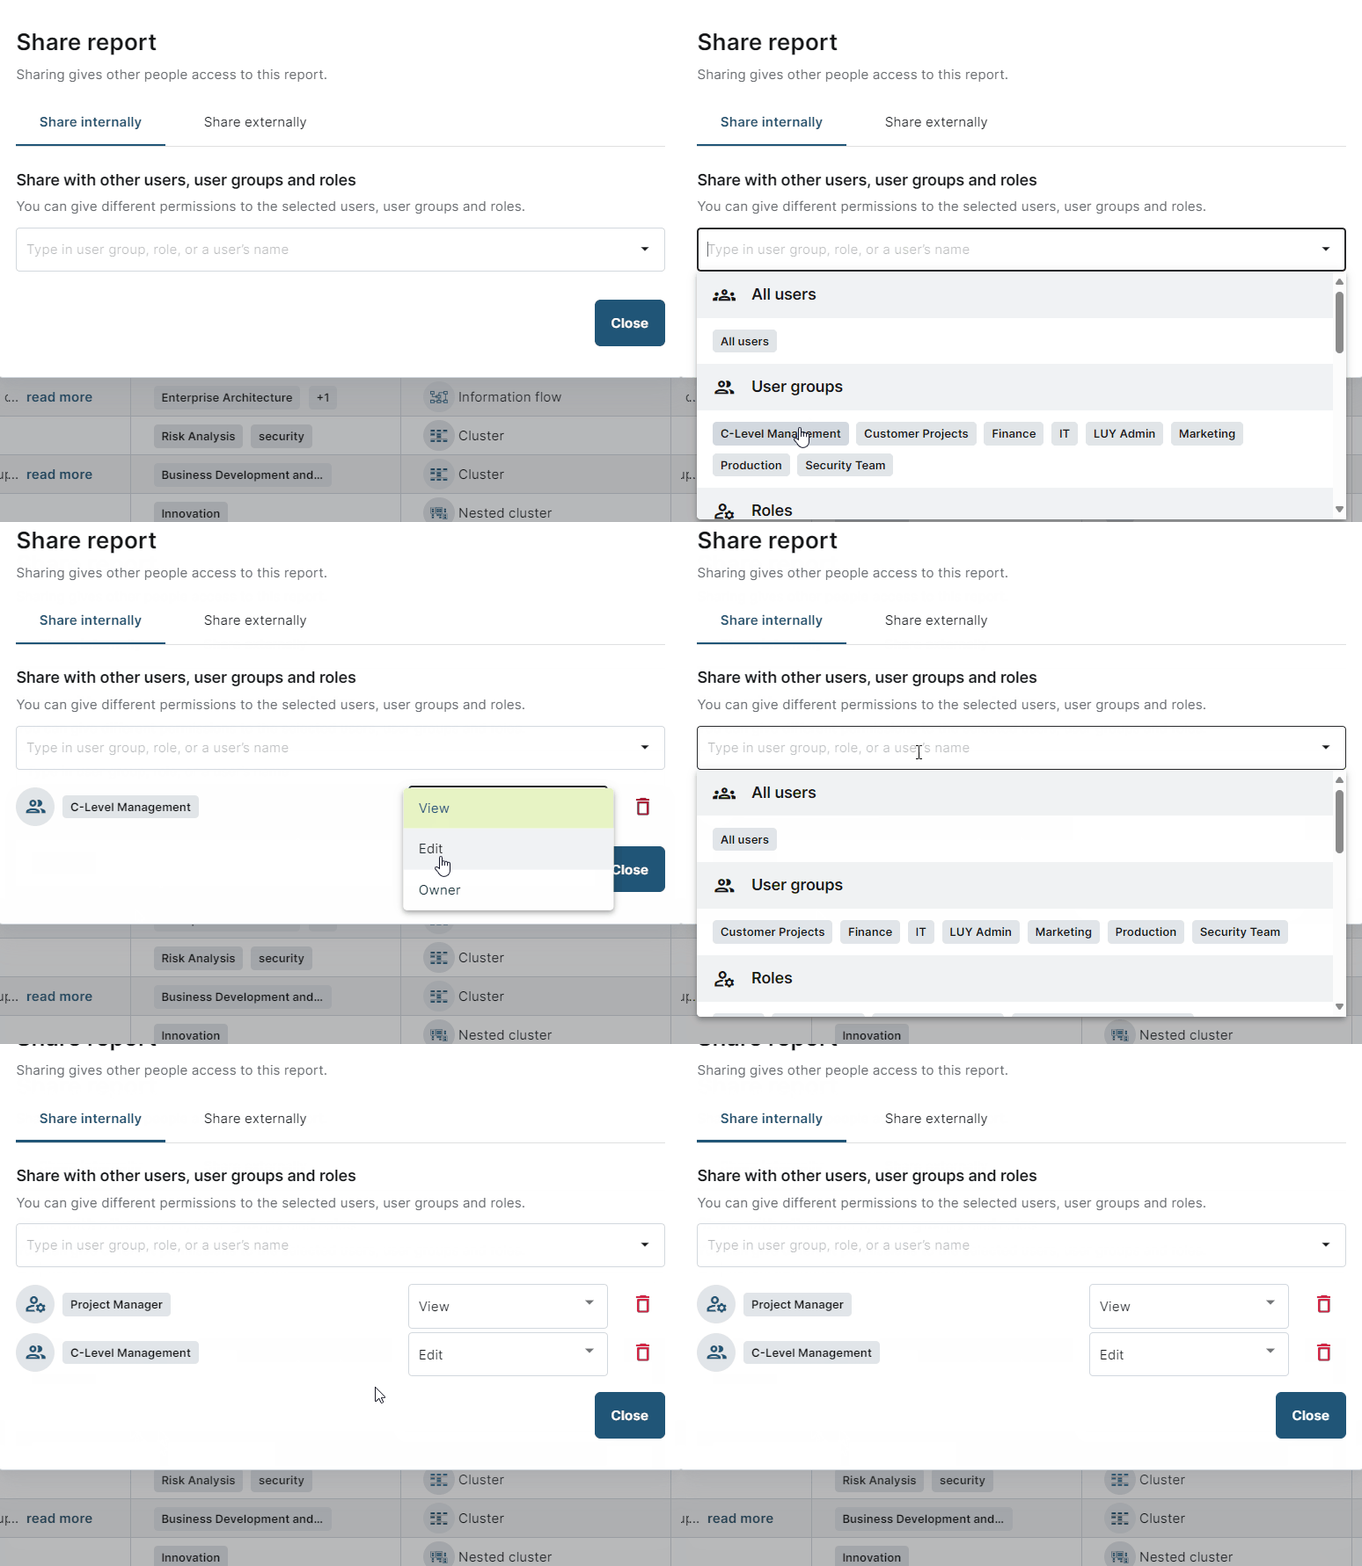
Clicking on the field labeled "Type in user group, role, or a user name" opens a dropdown menu organized by all available entries. The field also allows users to search for a specific entry by typing the name.
Select the desired entry from the dropdown to add it to the list of shared recipients.
Set the appropriate permissions for the recipients. There are three types of report-sharing permissions:
View: Recipients can only open the reports.
Edit: Recipients can open and modify the report's content, name, description, or tags.
Owner: Recipients have full access, including the ability to open, edit, delete, and share the report with others.
Repeat the steps until all desired entries have been added.
Click on close
Selecting the entry "All Users" will make the report accessible to all current and future LUY users.
In the Reports (Nova) table, hovering over the entries in the "Shared" column displays information about which “Users”, “User Groups”, or “Roles” the report is shared with, without requiring any editing.
Edit or delete shared reports internally
To modify or delete a report shared with other users, open the "Share report" dialog.
Edit entries: Update the existing entries or adjust permissions for the listed recipients.
Delete an Entry: Click the trash bin icon next to the entry to remove it from the shared list.
Share externally
In the "Share externally" tab, users can share reports with individuals outside the company. The opened table report can be shared in JSON or CSV formats.
Externally shared reports can be accessed via the displayed URL without being logged in to LUY!
When the toggle "Allow external sharing" is activated, the options for "Languages" and links to the available formats are displayed. For table reports, the formats JSON, CSV, CSV without links (syntax based on Confluence), and CSV with links (syntax based on Confluence) are available.
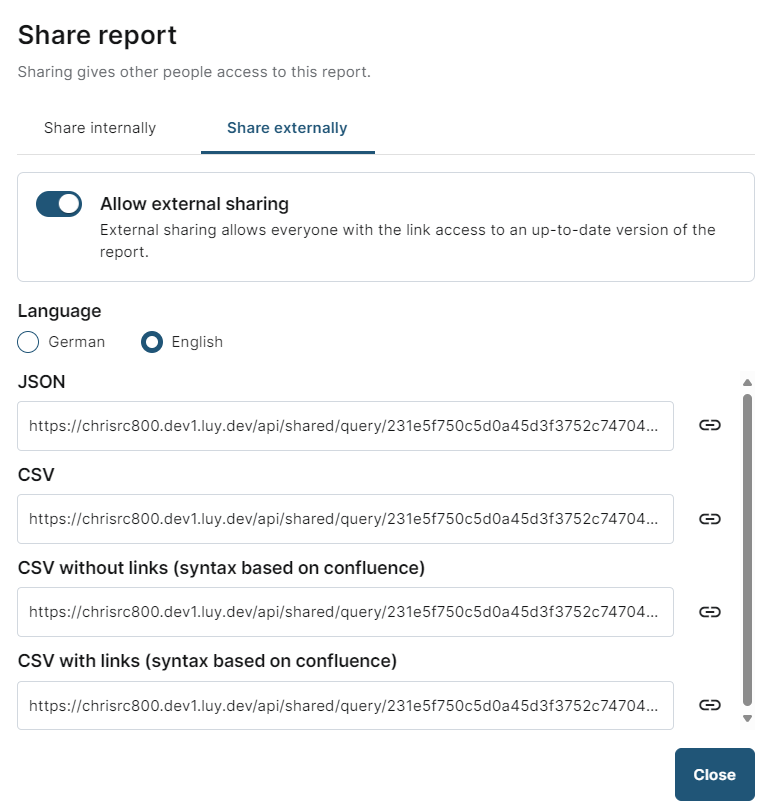
Clicking on the "Copy link" icon allows the link to be copied and shared or inserted into other locations.
Deactivate share externally
To deactivate external sharing for a table report, click on the active toggle "Allow external sharing" in the "Share externally" tab. The dialog will update, and external sharing will be disabled.
If a link to an externally shared table report is opened after deactivation, an error page will be displayed.
Delete table report
To delete an opened table report, click "Delete" in the "Report" menu. Clicking "Delete" opens the "Delete report" dialog. Confirming the action by clicking the "Delete" button in the dialog will permanently remove the opened table report from the application, and the table view will switch to its initial state.
If the report is shared with others, the following hint appears:
"This report is shared with others. Are you sure you want to delete the report [Report Name]?"
Subscribe and unsubscribe reports
To "Subscribe" or "Unsubscribe" to an opened report, click "Subscribe" in the menu. If the report is already subscribed, the menu entry will display "Unsubscribe", allowing the user to subscribe or unsubscribe from the table report.
In the top-right corner of the screen, a star symbol indicates the subscription status of the report. A filled star means the report is subscribed, while an empty star indicates it is not. Clicking the star allows the user to subscribe or unsubscribe.
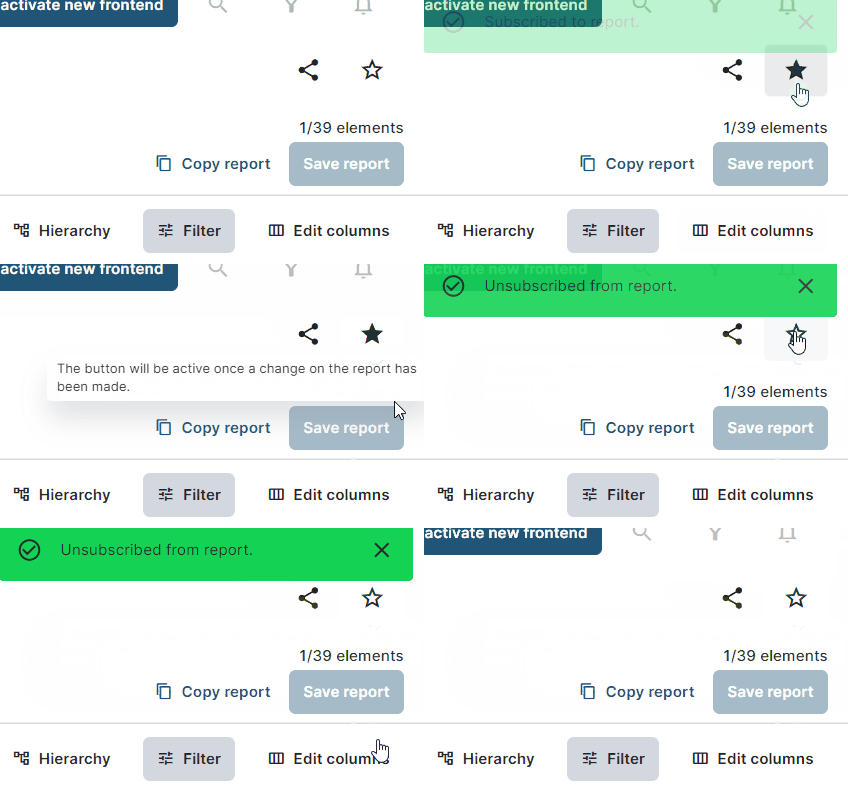
When a user is subscribed to a report, the user will receive an email notification if changes are made to the report. However, if the changes are made by the user themselves, these changes will not trigger a notification or subscription related email.
Filter table
The "Filter list" search bar allows users to quickly locate specific data by searching through names, descriptions, relations, business mappings, and attributes included in the currently displayed columns. This feature simplifies the process of finding the desired information.
For example, searching for a specific attribute value like "Planned" will display all rows where "Planned" appears in the visible columns.
The value set for the "Filter list" is not saved as part of a table report.
The search functionality is limited to the columns currently displayed in the table, and any columns not added to the table will not be included in the search.
Undo and redo
In the table view, the “Undo” and “Redo” features apply exclusively to changes made to columns, such as adding, removing, rearranging, filtering, or resizing them. These features enable users to switch between different setups or revert to the initial state of a loaded report or the table view. To use these functions, click the undo or redo icon when active.
Database changes, such as editing an attribute, cannot be undone or redone using these buttons.

The “Undo” and “Redo” features are highly useful in various scenarios.
For example, they allow users to easily compare two filter values directly. Set a filter, and once it’s active, change it to a different value. With the “Undo” and “Redo” functionality, users can seamlessly switch between the two filters without needing to load separate reports.
This makes exploring and analyzing data more efficient and intuitive.
Interacting with the table view
The table view provides various options for customization and interaction. Users can sort and order columns to organize data according to their needs.
Additional attribute information
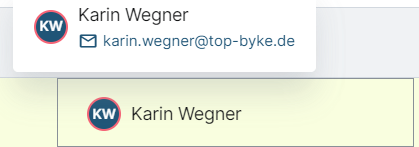
Hovering over the displayed values of an attribute reveals additional information for a more detailed overview, such as the email address in a responsibility attribute.
Sorting by columns
The entries within a column can be sorted by clicking on the column headers, allowing users to easily organize the data in ascending or descending order based on the selected attribute.
By holding the shift key and clicking on different column headers, users can sort multiple columns.
Order of columns
The order of the columns in the table view can be rearranged. By holding the left mouse button on a column header, users can drag and drop the column to the desired position.
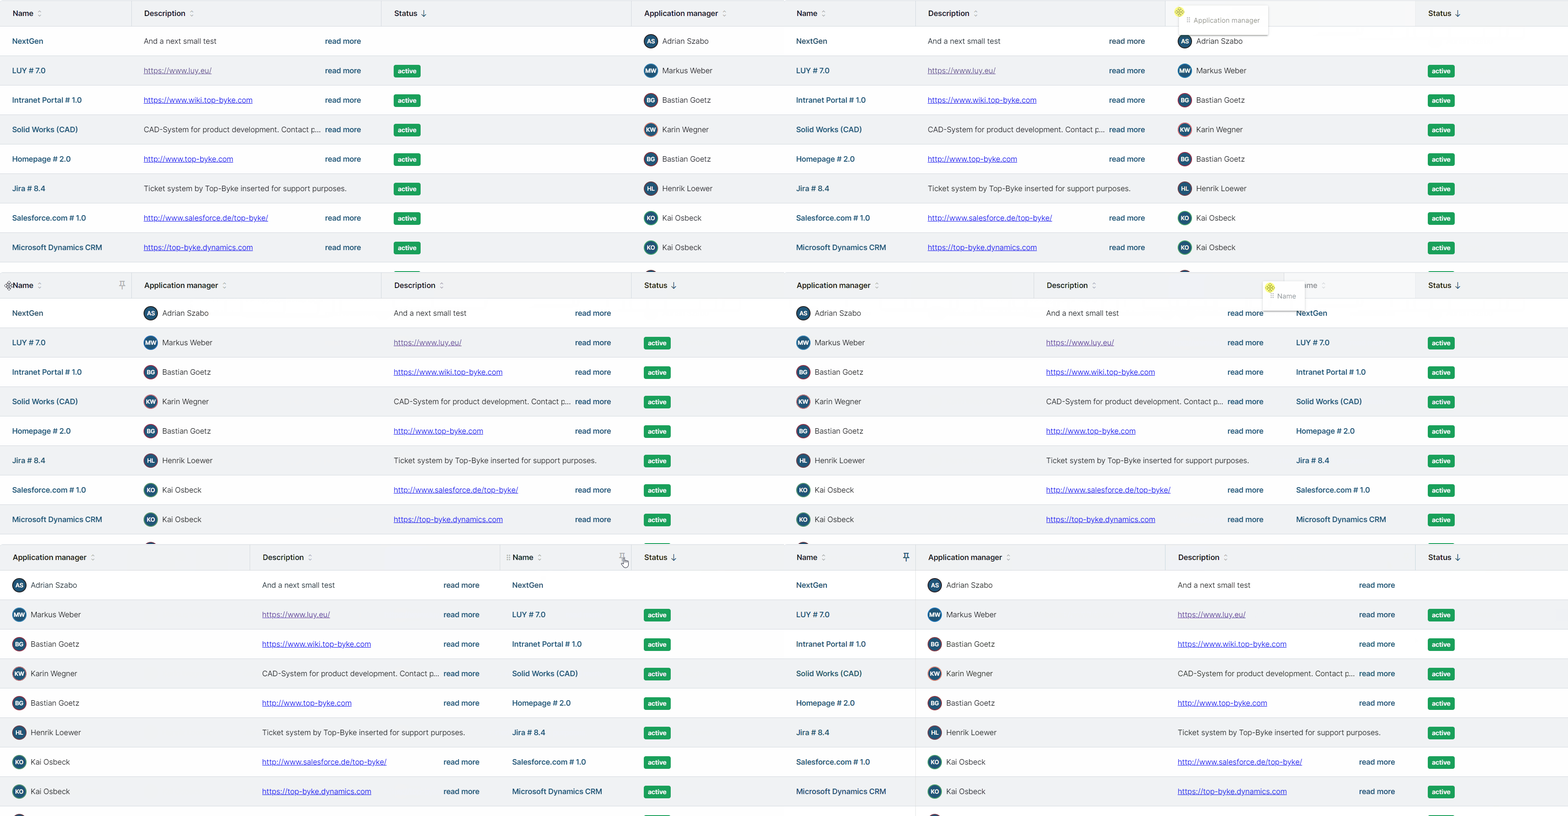
In addition, clicking the pin icon in the column header pins the selected column to the beginning of the table. Pinned columns remain fixed in place and cannot be reordered. This feature can be applied to a maximum of three columns to improve table organization. Pinned columns stay visible the left of your table when scrolling through the table horizontally.
Resizing columns
To adjust the size of the displayed columns and view more or less information, hover the mouse over the line between two columns. When the resize icon appears, hold down the left mouse button and drag to resize the columns to the left or right.

If a column is too narrow to display all entries for a specific attribute, the following behavior applies:
For text, numeric, date, or date interval attributes, three dots ("…") indicate that the content has been truncated. Hovering over the entry displays the full content.
A "Read more" option is displayed for multiline text attributes. Clicking it opens an info box displaying the full text.
Entries for enumeration or responsibility attributes with multiple values are summarized and displayed
as "+[Number of entries]". Clicking on the summary expands to show the full list of values. If only one value is set and is truncated, three dots ("…") indicate this. Hovering over the entry reveals the full text.
Table view display settings
The "View" menu offers options to customize the display of the table view. Users can adjust the table's layout and toggle between different display settings:
Compact rows: The "Compact rows" option reduces the row height, allowing more entries to be displayed simultaneously.
Altering row colors: The "Altering row colors" option removes the default alternating row colors (white and gray), displaying all rows with a uniform white background.
Show horizontal gridlines: The "Show horizontal gridlines" option adds horizontal lines to the table, improving readability by visually separating rows.
Show vertical gridlines: The "Show vertical gridlines" option adds vertical lines to the table, improving readability by visually separating rows.
